How to Install a Compact Rear Rack on Your City Bike — Step‑by‑Step Guide with Tools & Safety Tips
Introduction
Installing a rear rack transforms a city bike into a versatile cargo carrier, enabling daily commutes, grocery trips, and weekend adventures without sacrificing comfort. This guide will teach the reader how to select a compatible rack, prepare the necessary tools, and complete a secure installation while observing best safety practices. By following each instruction, one will achieve a reliable mounting that can support the advertised load capacity of the chosen rack. The information presented is applicable to most 26‑to‑29 inch frames and does not require specialized workshop equipment.
What You’ll Need
- A compact rear rack such as the Geebul Rear Bike Rack (price $35.99, rating 4.6/5)
- Allen wrenches and a nut wrench (often included with the rack)
- A torque‑wrench or adjustable wrench for tightening bolts to the proper torque
- Measuring tape or ruler to verify height adjustments
- Optional: WINFAVO Bike Repair Tool Kit (price $21.59, rating 4.6/5) for additional bits and a mini pump
Step 1: Verify Frame Compatibility
Before purchasing any rack, confirm that the bike frame does not have a disc‑brake caliper mount that blocks the standard mounting points. The Geebul rack includes a detailed image gallery that highlights frames it does not fit; reviewing those images prevents costly returns. If the bike uses a rear disc brake with an external caliper, consider the Ibera Bike Touring Rack, which offers a disc‑brake‑compatible version. Verifying compatibility at this stage saves time and ensures a smooth installation.
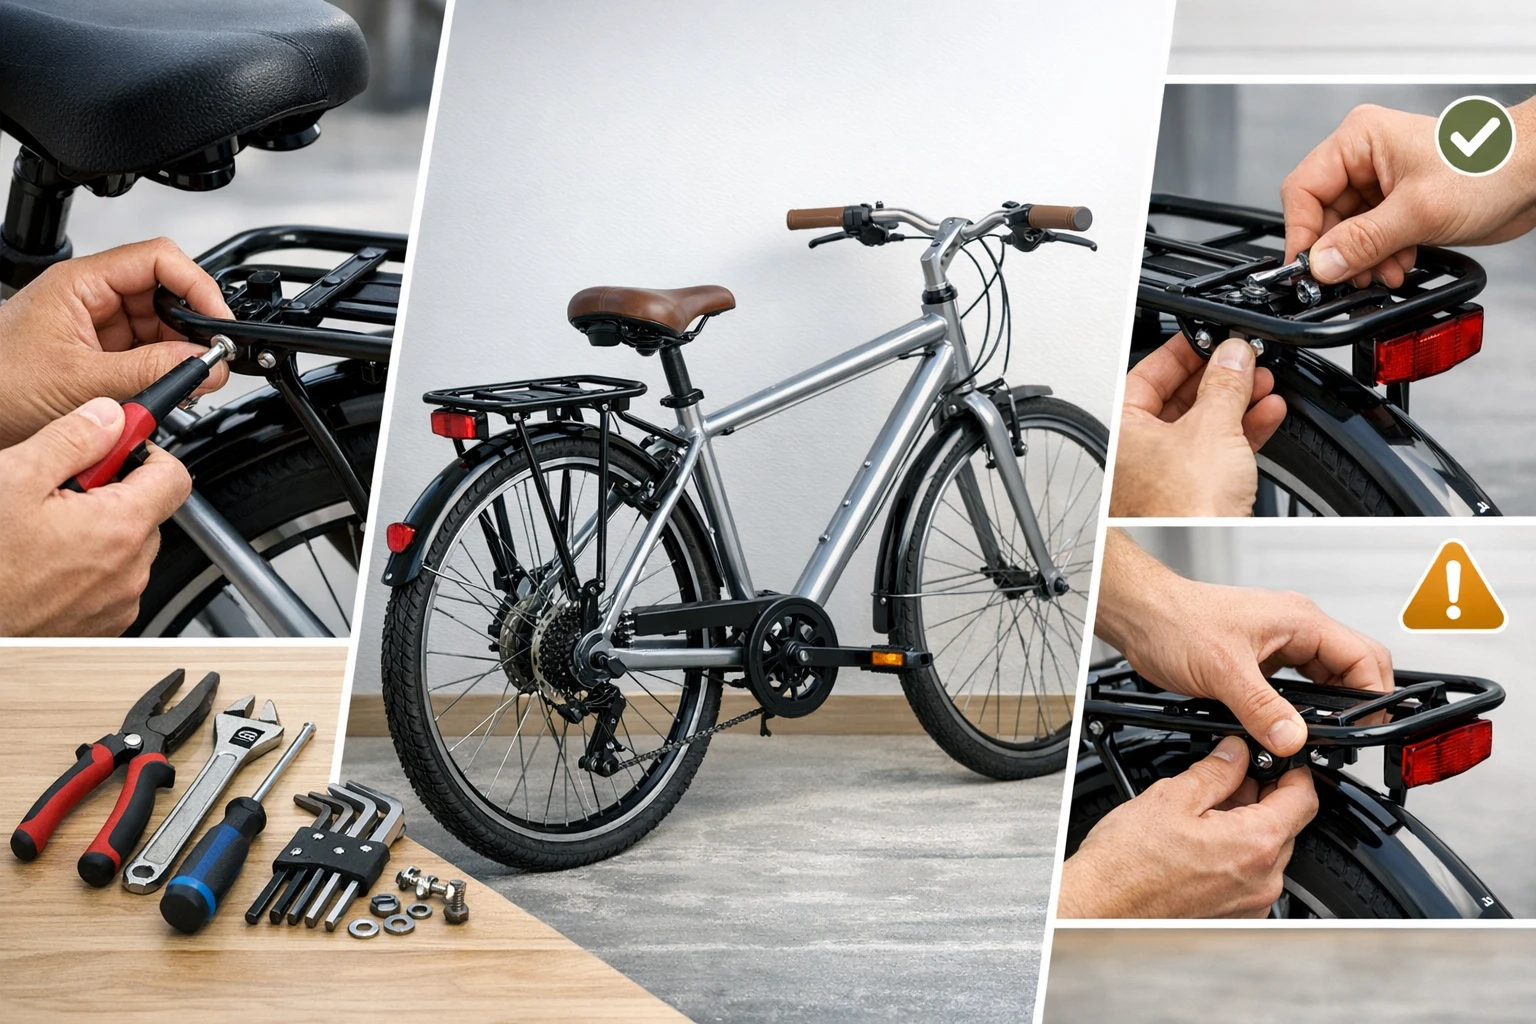
Step 2: Gather and Organize Tools
Lay out all required tools on a clean work surface. The Geebul rack arrives with a complete tool kit, including two allen keys (4 mm and 5 mm) and a nut wrench, allowing assembly in under ten minutes. If additional bits are needed, the WINFAVO tool kit provides magnetic hex, Phillips, and Torx bits that snap securely into the ratchet handle, reducing the chance of stripped screws. Having every tool within reach minimizes interruptions and maintains a steady workflow.
Step 3: Assemble the Rack Frame
Follow the visual guide supplied with the rack. Align the left and right side arms with the central cross‑bar, then insert the provided bolts through the pre‑drilled holes. Tighten each bolt by hand until snug, then use the allen wrench to achieve a firm connection. The Geebul rack is constructed from aircraft‑grade 6061‑T6 aluminum, weighing only 990 g, which provides high strength without adding significant weight to the bike. This lightweight construction is advantageous for city cyclists who value maneuverability.
Step 4: Position the Rack on the Seatstay
Slide the assembled rack onto the seatstay, ensuring that the mounting brackets sit flush against the frame’s threaded holes. The rack offers a four‑position height adjustment, allowing the user to raise or lower the platform to match the bike’s geometry. Align the rear eyelets with the rear drop‑outs; this alignment prevents the rack from contacting the rear tire during turns. Secure the lower mounting bolts with the supplied stainless‑steel hardware, which resists rust in wet conditions—an essential feature for commuters riding in rain.
Step 5: Adjust Height and Angle
Use a measuring tape to set the rack platform at a height that clears the rear tire by at least 2 cm. The Geebul rack’s adjustable brackets enable fine‑tuning without additional tools. For bikes with a higher bottom bracket, raise the rack to the second or third position to maintain a level loading surface. A level platform distributes weight evenly, reducing stress on the frame and improving handling when the rack is fully loaded.
Step 6: Secure All Fasteners
After positioning, tighten each bolt to the manufacturer’s recommended torque of 5 Nm. Over‑tightening can strip the aluminum threads, while under‑tightening may allow the rack to shift under load. The included torque‑wrench in the WINFAVO kit ensures precise tightening. Apply a thin layer of thread‑locking compound if the bike will carry heavy loads regularly; this precaution prevents bolts from loosening due to vibration.
Step 7: Install Reflectors and Safety Accessories
Both the Geebul and LEPump racks incorporate an integrated reflector that enhances night visibility. Verify that the reflector is positioned on the rear side of the rack and is not obstructed by pannier bags. If additional visibility is desired, attach a small LED light to the rear eyelet using the provided zip‑tie. Reflectors are a low‑cost safety upgrade that complies with many local traffic regulations.
Tips & Pro Tips
- Use a piece of masking tape on the frame to mark the exact drilling depth; this prevents accidental over‑penetration of the seatstay.
- When installing on a bike with a narrow rear tire, consider the LEPump Rear Bike Rack which offers a narrower W‑shaped bar design that minimizes tire clearance issues.
- Apply a light coat of silicone grease to the stainless‑steel bolts to protect against corrosion in humid climates.
- After the first ride, re‑check all bolts after 20 km; the initial tightening may settle as the aluminum expands slightly under load.
Troubleshooting
Problem: The rack rubs against the rear tire during hard cornering.
Solution: Lower the rack by one adjustment position or trim the side bar using a metal file. Ensure the W‑shaped bars are oriented outward to maximize clearance.
Problem: Mounting bolts strip the frame threads.
Solution: Use a tap set to re‑thread the holes, or install the optional locking nuts that come with the Dirza rack for added durability.
Problem: The rack feels unstable when loaded.
Solution: Verify that the quick‑release seatpost clamp is fully engaged and that the rubber shims are correctly placed to distribute pressure evenly.
Conclusion
By following this guide, the reader has learned how to select a compatible rear rack, prepare the necessary tools, and complete a secure installation that meets the manufacturer’s load specifications. Proper adjustment, torque, and safety checks ensure that the rack will serve reliably for daily commuting, grocery runs, and longer touring adventures. The recommended products provide a balance of durability, ease of installation, and value, but the process can be completed with generic tools if desired. A well‑installed rear rack expands the functionality of any city bike, making urban cycling more convenient and enjoyable.
Products Mentioned in This Guide
Frequently Asked Questions
How do I know if a compact rear rack fits my city bike?
Check that the rack’s mounting holes align with eyelets on a 26‑ to 29‑inch frame and that the axle spacing matches your bike’s rear dropout width.
What basic tools are required for installing a compact rear rack?
You need Allen wrenches, a nut wrench, a torque or adjustable wrench, and a measuring tape.
How tightly should I torque the rack bolts?
Tighten bolts to the manufacturer’s recommended torque, typically 5–8 Nm, using a torque wrench to avoid over‑tightening.
Can I carry heavy groceries on a compact rear rack?
Most compact racks are rated for 20–30 lb; stay within the specified load limit for safe handling.
What safety checks should I perform after installing the rack?
Verify that all bolts are secure, the rack is level, and the bike rides straight without wobble before loading.